How to Enchant Items in Minecraft
Enchanting is the way to make magic
armor, weapons or tools. To enchant an item, you trade in experience levels.
The more levels you trade in, the stronger the enchantment will be — but you
won't know what you're getting until after it's done!
Enchantable
Items
You can enchant all kinds of armour,
swords, bows and tools including shears, fishing rods and flint-and-steel.
Enchantments
 How to Enchant Items
Get
some experience points
Enchanting works by trading in
experience levels (the green number above your toolbar) for enchantments. You
get experience points (XP) in several ways, the main ones being killing mobs
and from cooking or smelting things in furnaces.
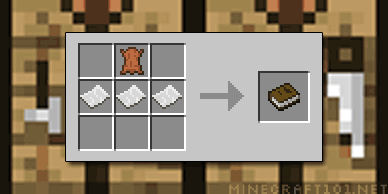
Build
an enchantment table
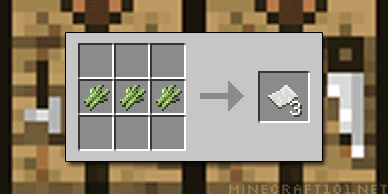
You will need obsidian, two diamonds and a book (made from paper, which is made from sugar cane, and leather, for which you
will have to kill a cow).

Enchant
your item
Right click on the enchantment table
to bring up the enchanting interface.

Place the item you wish into the
slot, and three potential enchantments will be offered.

The number of levels the enchantment
will cost is shown in green; if you don't have enough levels the enchantment
will be greyed out. Generally, the more levels you spend, the better the
enchantment you will get.
The mysterious characters can be
decoded, but they are not helpful. You can not tell what the enchantment will
be until you purchase it.
If you don't fancy any of the
enchantments offered (perhaps you wanted to spend a particular number of
levels), you can pick up and replace your item and you will get a new set of
offers.
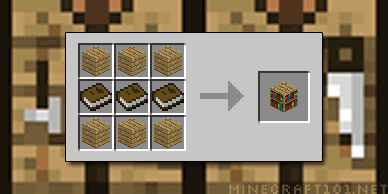
Higher
Level Enchantments
A basic Enchantment Table will only
allow you to spend up to 8 levels on an enchantment. For more powerful
enchantments, you will need to build bookshelves and place them near the enchantment table.
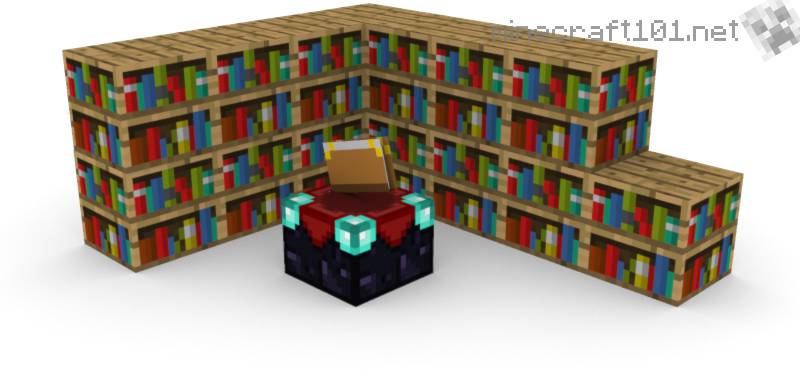
Each bookshelf increases the maximum
available enchantment by 1 or 2 levels, up to a maximum of 30 levels (15
bookcases).
Bookshelf
placement
Bookshelves should be 2 blocks away
from the table, on the same level or one higher. There must be nothing between
the bookshelf and the table.
 Enchanted books
Instead of enchanting an item, you
can enchant a book instead. The enchantment can be saved for later, and applied
to an item using an Anvil.
Why would you want to do this?
- Maybe you have a lot of experience levels but don't have anything to enchant at the moment.
- Maybe you really want a Fortune enchanted pickaxe and don't want to waste diamonds on yet another Silk Touch tool.
Combining
Enchantments
Once an item is enchanted, it can't
be further enchanted using an Enchanting Table.
However, you can combine two
enchanted items, or add a second enchantment from an enchanted book, using an Anvil.
Repairing
Enchanted Items
How to Brew Potions in Minecraft
Collect
the stuff you will need
Go
to the Nether
You'll need to build a Nether
Portal to get to the Nether. If this is
your first trip there, be careful! You will need good armour, a bow, and plenty
of arrows. If you have armour with a Fire Resistance enchantment, so much the
better.
Find
a Nether Fortress
Find a Nether Fortress; this is a
building made out of Nether Bricks.
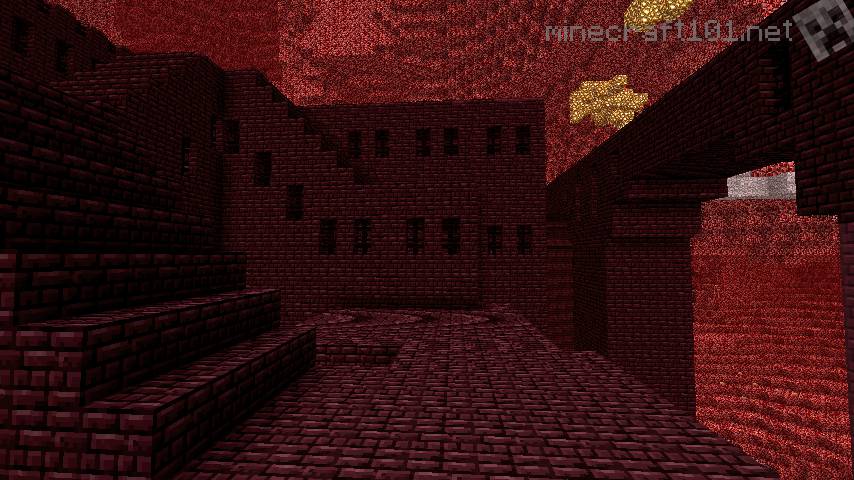
A nether fortress; look out for the
dark Nether Bricks.
Get
some Nether Wart
Explore the fortress until you find
some Nether Wart; it will be growing in Soulsand at the bottom of a staircase.
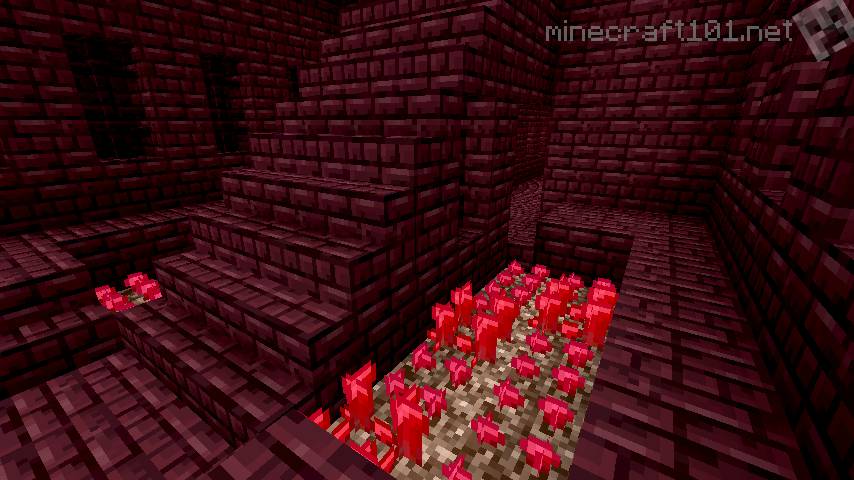
Collect all the Nether Wart, and dig
up the Soul Sand while you're at it. If you see more Soul Sand on your way back
to your Portal, get some more.
 Get Blaze Rods
Find Blazes, kill them and collect
at least one Blaze Rod.
Be careful, Blazes are a dangerous
enemy, and it's better to pick them off with arrows from a distance.
You can find Blazes hanging out
anywhere in a Nether Fortress, but sometimes you will find rooms with a Blaze
Spawner: it's dangerous to get too close to these.
Now head back to your Portal and get
ready to brew!
Set
up your Brewery
Nether
Wart Farm
First, place the Soulsand you
brought back, and plant some Nether Wart on it. This is your Nether Wart Farm.
Nether wart is an ingredient in almost all the useful potions.
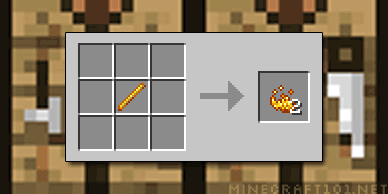
Craft
a Brewing Stand

Use your Blaze Rod and some
Cobblestone.
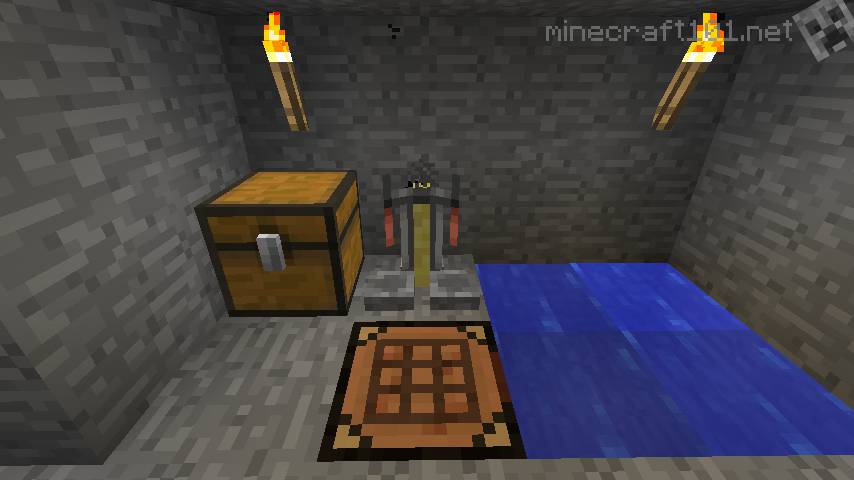
Water supply, brewing stand and
storage.
To start brewing, you will need some
glass, some Nether Wart, and some potion ingredients (check out the recipes to see what you'll need).
Brewing
Potions
Prepare
Water Bottles
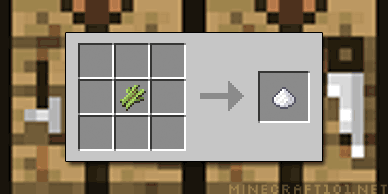
Make some glass bottles:

Fill three bottles with water by
right-clicking on your well (the water bottles do not stack; they will appear
elsewhere in your inventory, so make sure you have some free slots first.
Load
the Brewing Stand
When you right-click on your Brewing
Stand, the brewing interface will open.

Place the water-bottles in the
bottom three spaces.

Add
the first ingredient
The first ingredient will almost
always be Nether Wart. Place it in the top slot and brewing will start.

When the brewing is completed (it
takes 20 seconds), your water bottles will have been turned into potions! This
potion is called Awkward Potion, and it is not useful on its own. You must add
a second ingredient.
Add
the second ingredient
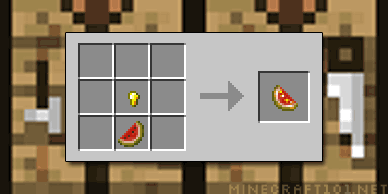
It's time to add a second
ingredient. This ingredient will determine what kind of potion you are making. Glistering Melon
will give you a Potion of Health; use Sugar for a Potion of Swiftness, Blaze Powder
for a potion of Strength, or check out the other recipes here.

When this step has finished, you
will have three useable potions!
Optional
Ingredients
Further ingredients can be added to
make a stronger potion, or a splash potion that can be thrown at friends
or enemies.
 |
Redstone
|
Makes the effects of your potion
last longer.
|
 |
Glowstone
|
Makes the effect of your potion
stronger.
|
 |
Gunpowder
|
Makes a splash potion that can be
thrown and will affect nearby players and mobs when it breaks.
|
Drinking
Your Potion
Hold down the right mouse button,
just like eating food.
Potion Recipes
Ingredients
See the full list here.
Glowstone
This optional ingredient increases the strength of your
potion.
Redstone
This optional ingredient increases the duration of your
potion. Recipes
First place Water Bottles in the Brewing Stand. Then add these ingredients in order.Useful Potions
|
First
|
Second
|
Third
|
Fourth
|
Potion of Healing
Restores your health.
|
|||
 |
 |
(optional) |
-
|
Potion of Regeneration
Restores health over time.
|
|||
|
|
 |
or (optional) |
|
Potion of Fire Resistance
Gives immunity to fire and lava. Great for fighting
Blazes.
|
|||
|
|
 |
(optional) |
-
|
Potion of Strength
Increases the damage you do in melee combat.
|
|||
|
|
 |
or (optional) |
|
Potion of Swiftness
Increases your speed.
|
|||
|
|
 |
or (optional) |
|
Potion of Night Vision
You can see in the dark.
|
|||
|
|
 |
(optional) |
-
|
Potion of Invisibility
Makes you invisible, but you have to take off your armour.
|
|||
|
|
|
 |
(optional) |
Useful Splash Potions
|
First
|
Second
|
Third
|
Fourth
|
Fifth
|
Splash Potion of Healing
Harms Skeletons, Zombies, Zombie Pigmen and Withers.
|
||||
|
|
|
(optional) |
|
-
|
Splash Potion of Harming
Heals Skeletons, Zombies, Zombie Pigmen and Withers, but
harms other mobs.
|
||||
|
|
|
|
(optional) |
|
|
|
 |
|
(optional) |
|
Splash Potion of Weakness
Useful against cave spiders; also can be used to heal
Zombie villagers.
|
||||
|
anything
or nothing |
|
(optional) |
|
-
|
Not-very-useful Potions
The splash versions of these might be useful in the multiplayer game.|
First
|
Second
|
Third
|
Splash
|
Potion of Poison
Causes damage over time, but won’t kill. Why would you
drink this?
|
|||
|
|
|
or (optional) |
|
Potion of Slowness
Restores health over time.
|
|||
|
Potion of
Swiftness or Potion of Fire Resistance |
|
or (optional) |
|
Potion of Weakness
Additional ways to make the thing.
|
|||
|
Potion of
Strength or Potion of Regeneration |
|
or (optional) |
|
Tidak ada komentar:
Posting Komentar