Anvils and Item Repair
There are two ways to repair items
in Minecraft: with and without an Anvil.
Repairing
Items the easy way
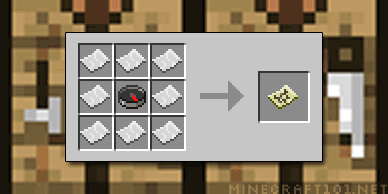
Items such as weapons, armour and
tool can be repaired by placing two damaged items of the same type on a
crafting grid:

The two items will be combined to a
single one with durability equal to the two plus a small bonus (so to get best
value from the repair, both items should be used until they are below 45%
durability.
Any enchantments will be lost
when repairing items this way.
Anvils

Anvils allow you to rename items,
repair enchanted items, and even combine the enchantments from different items,
at the cost of experience points.
Crafting

Renaming
items
Now your enchanted sword can be
called Excalibur if that's what you want, or indeed you could call an apple
"Derek" if that's what takes your fancy.

Place your item on the left and type
the new name in the box. The experince cost will be displayed, and if you're
happy, take the renamed item from the right.
Item
repair
Enchanted items can be repaired by
placing either another item or the material from which they are made in the
second slot.

An
enchanted diamond axe can be repaired using either a diamond, or another
diamond axe.
Combining
Enchantments
Place two enchanted items of the
same type on the left, and if possible their enchantments will be
combined into a new item.

Two
enchanted pickaxes can be combined to make an even better one - note that their
durability is added so this is a repair job too.
- Not all combinations are possible — you can't have both Sharpness and Smite on the same sword, for instance.
- Enchantment ranks can be added — you can combine two Bows with Power I to get one with Power II
- The order in which you place the two items makes a difference: the anvil takes the first item and tries to add enchantments and durability from the second item if possible. This affects the cost, so try both ways round.
Using
Enchanted Books
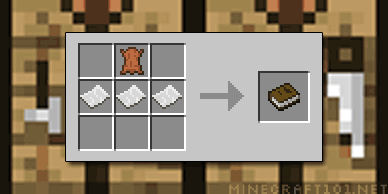
Anvils are used to transfer an
enchantment from an enchanted book to an item; place the item and the book in
the slots - easy!

Two enchanted books can be
combined on an anvil to make a new book with both enchantments.

Limitations
The cost of repair depends on a
number of factors, including how many times the item has been modified with the
anvil. Operations that would cost more than 40 experience levels are not
allowed.

These
two pickaxes have a lot of high-level enchantments each, and combining them
would just be too awesome to be allowed.
Enchantments
Here are the available enchantments in the game.Some enchantments are available at different strength levels.


 Armour
Enchantments
Armour
Enchantments
The "Protection" enchantment is effective against all types of
damage, but the specific enchantments are stronger: if you're fighting
Skeletons, "Projectile Protection IV" will be better than
"Protection IV".Protection
Makes your armour more protective. Max level IV.Fire Protection
Reduces damage from fire; reduces the length of time you stay on fire. Max level IV.Blast Protection
Reduces the effects of explosions. Max level IV.Projectile Protection
Reduces damage from arrows and fireballs. Max level IV.
Helmet
Enchantments
Aqua Affinity
Allows you to break blocks more quickly when underwater (works better when standing on the bottom than when swimming).Respiration
Increases the length of time you can stay underwater before drowning. Max level III.
Chestpiece
Enchantments
Thorns
A chance of damaging your enemies when they attack you. Max level III. The level affects the chance of doing damage, not how much damage.
Boot Enchantments
Feather Falling
This enchantment reduces the damage you take when you fall. Max level III.
 Sword Enchantments
Sharpness
Increases damage dealt. Max level V.Smite
Increases damage dealt to "undead" enemies (Zombies, Zombie Pigmen, Skeletons and the Wither).Bane of Arthropods
Increases damage dealt to spiders and silverfish. Max level V.Knockback
Increases the distances enemies are knocked back when you hit them. Max level II.Fire Aspect
Sets the target on fire. Max level II. Use this on your farm animals and they will drop cooked meat! Not so useful in the Nether whaere most of the bad guys are immune to fire.Looting
Mobs will drop more loot — very useful when killing your farm animals for meat or leather. Max level III.
 Bow Enchantments
Power
Increases the damage dealt by your arrows. Max level V.Punch
Increases the distances enemies are knocked back when you hit them. Max level II.Flame
Fires flaming arrows, which cause extra damage and can set off TNT. Max level II.Infinity
Firing your bow doesn't use up arrows. You still need to carry at least one arrow with you, though.


 Tool Enchantments
Efficiency
Increases the speed of mining, digging or chopping. Max level V. An Efficiency V shovel shifts sand and gravel so fast you won't believe it, and mining obsidian becomes almost bearable with an Efficiency V pickaxe.Silk Touch
Certain blocks that normally turn into something else when mined can be collected with a Silk Touch tool. For example, grass would normally be turned into dirt, but you can use a silk touch tool to collect grass blocks (great if you want to grow a lawn underground or in the Nether).Other blocks that can be collected with Silk Touch include Ice, Mycelium, huge mushroom blocks and all kinds of ore.
Fortune
Increases the drop rate of items from blocks. Max Level III.This enchantment lets you get more items from blocks that turn into items when mined, such as diamonds, emeralds, coal, redstone, lapis lazuli, glowstone, melons and flint. A Fortune III shovel turns all of the gravel you dig into flint.
Unbreaking
Increases the durability of your enchanted item, making it last much longer. Max level III.Enchanting Other Items
Some of these enchantments can be applied to other items if you use an Anvil to transfer them from an Enchanted Book.Unbreaking
Unbreaking can be applied to all types of Armour and Weapons, as well as Hoes, Shears, Flint and Steel and Fishing Rods.Shears
Shears can be enchanted with Silk Touch — useful for collecting cobwebs.Axes
Axes can be given all of the Sword enchantments.Thorns
Thorns can be applied to Helmets, Leggings and Boots.
Furnaces and Smelting
Furnaces are used for smelting ore
to turn it into usable metal. They are also used to turn sand into glass, to
bake clay into bricks and to turn cobblestone back into smooth stone.
Furnaces are also used for cooking
food.
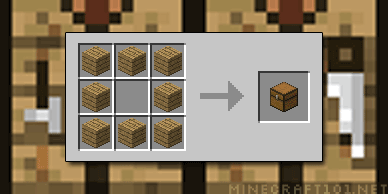
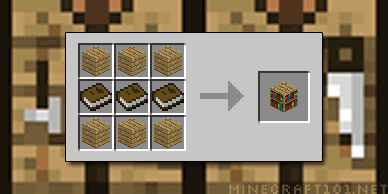
Making
a Furnace
Furnaces are made by combining 8
cobblestone blocks on a crafting table.

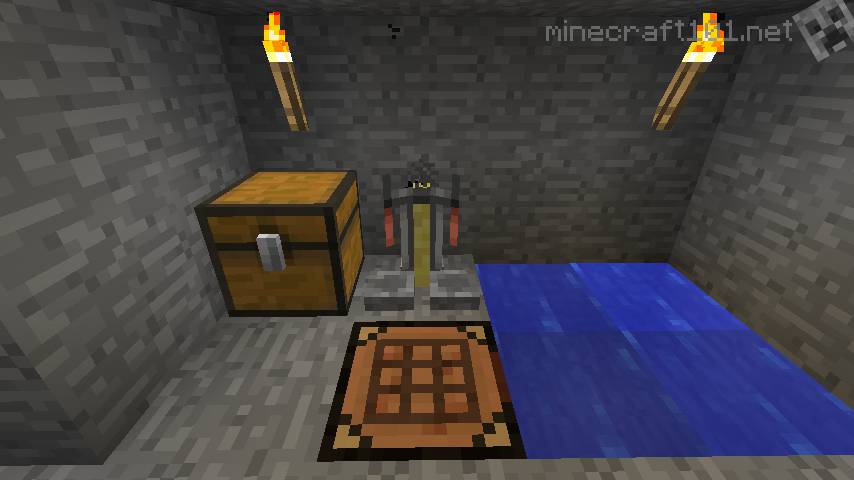
Using
a furnace
When you right-click on a furnace,
you are presented with a new version of your inventory screen:
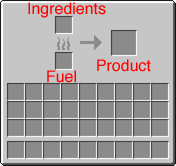
Place fuel in the lower slot and the
items to be cooked or smelted in the upper slot. When done, the product will
appear to the right.
Tip: Once you have loaded up your furnace, you can press 'E' to
close the window and go about your business. You don't have to stay and watch!
Flames will be visible on the active furnace, and will disappear when your
selting or cooking is done.
Fuel
for your furnace
Coal
You will mostly use coal for
smelting and cooking. It's very abundant and once you start mining and
exploring underground you'll have more than you know what to do with. However,
there are other options if you need them. One piece of coal burns long enough
to smelt or cook 8 items.
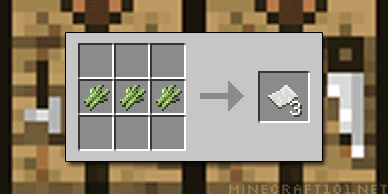
Wood
Wood blocks, wooden planks, sticks
and tree saplings can all be used as fuel. If you're burning wood, the most
efficient form to use is wooden planks; two planks will smelt or cook 3 items.
However, more efficient still is to make charcoal.
Most other wooden items such as
fences, wooden tools and crafting tables can be used as fuels in a pinch.
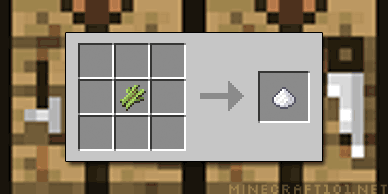
Charcoal
Charcoal is a form of coal that is
made by baking wood blocks in a furnace. It has exactly the same properties as
coal; it is an efficient fuel and can be used to make torches.

Other
Fuels
Lava buckets and blaze rods will
also act as fuel. Lava buckets provide enough heat to cook 100 items (and yes,
you do get the empty bucket back afterwards).


